Make Your Own Spanish Guitar - online book
Complete plans & Instruction on how make your own Spanish Guitar.
| Share page | Visit Us On FB |
|
22 |
|||
|
|
|||
|
FITTING THE BACK
Everything readily to hand, we can pro�ceed to fit the back . . . with the sides still in the mould. If the fitting of the back is attempted with the sides out of the mould, the finished guitar will surely be out of shape.
First brush a thin coat of glue over the surfaces of the blocks and all round the top surface of the linings. Next place the back in position, seeing that the cross struts fall easily into place in the recesses cut in the linings. Then, having previously warmed over a gas flame the glueing frame, put this on top of the back and fix two large G cramps in position; one over each of the end blocks.
Working from each of these clamps, pro�ceed round each side; placing a wood clip in position as you go. Particular care should be taken at the waist on each side.
The thin knife blade dipped in hot water and slid between back and sides can be used to revive the glue in any place.
The above operation should be done as quickly as possible but without undue haste, otherwise the glue will begin to set and be�come too hard to grip.
If the glued surfaces have been prepared correctly it should not be necessary to add any more glue. |
Finally, when it is certain that the back has been secured all round the sides and that all the wedges holding the clips are tight* take a clean rag and, after dipping it in hot water and having wrung it out tightly, wipe all round the inside joint of the back and sides to remove any surplus glue squeezed out by the cramping. If you have followed the instructions carefully, very little surplus glue should appear.
The completed assembly should then be put on one side on a level surface for from four to six hours (or more) to allow the glue to set properly.
When the time comes, the face of the guitar is fitted in a similar manner to the back and when this operation has been finished, and time allowed for the glue to set, the body can be removed from the mould and surplus wood overhanging the sides can be trimmed off with a chisel or very sharp knife; care being taken to keep the finished edges of both back and face in perfect line with the sides of the instrument.
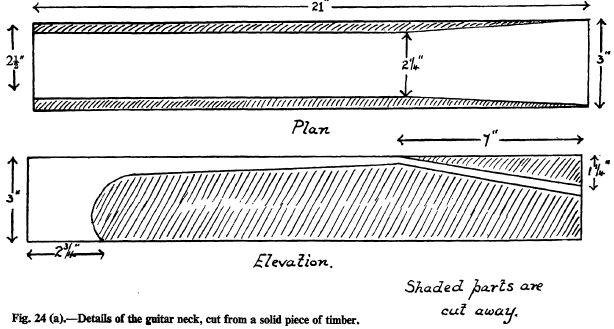
THE NECK
The body of the guitar can now be laid aside and we start to make the neck of the instrument.
For this you will need a piece of hard rosewood, walnut or maple (or other suit- |
||
|
|
|||
 |
|||
|
|
|||